The first thing that needs to be done is to determine how the Edge Transport server role will be implemented and configured
in the Exchange environment. This involves planning and designing the
placement of the Exchange Edge Transport server location, considering
configuration options, and then actually installing the Edge Transport
Services onto a server in the network. This section defines the
configurable items for the components available on an Exchange 2007
server when the Edge Transport server role is selected during
installation. Several items are identified in this section specific to
the appropriate configuration options to properly achieve a secure,
effective, and stable Edge Transport server environment.
Planning the Implementation of the Edge Transport Servers in Exchange
The first item to consider when installing and
configuring the Edge Transport Services is the desired end result of the
email message or connection being processed by the Edge Transport
server. Determining what type of email should always be rejected,
quarantined, or tagged for end-user review or which connections should
be blocked and for how long will help reduce the amount of false
positives and allow for a moderately aggressive spam filtering policy
the first time Edge Transport servers begin monitoring email for an
organization.
Planning for the Message Processing Order of Edge Services
To assist with the planning for your Edge
Transport server deployment, take a moment to become familiar with the
order in which filtering agents analyze messages. Understanding the
order in which messages are processed will help you determine where you
should place filters and assign settings for messages you do or don’t
want to receive. The Edge Transport Antispam filtering order is as
follows:
An email message is received from the Internet.
The IP Block and Allow Lists are checked for a match to the sending IP address.
The IP Block List Providers and IP Allow List Providers are checked for a match to the sending IP address.
The Sender Filtering Agent checks the Blocked Senders list for a match.
The SenderID Agent performs a Sender Policy Framework (SPF) record lookup against the sending IP address.
The
Recipient Filtering Agent checks the Blocked Recipients list for a
match. This is also where messages addressed to nonexistent recipients
get identified.
The
Content Filtering Agent analyzes the content contained inside the
message. Using Safelist Aggregation, the Content Filtering Agent also
recognizes block and allow entries obtained from users’ Outlook clients.
Attachments are analyzed by the Attachment Filter Agent. Edge transport rules run against the message.
The
message is either delivered to the Hub Transport server, rejected,
deleted, sent to the spam quarantine mailbox, or placed in the user’s
Junk E-Mail folder in the Outlook client.
Note
Messages can be identified for delivery or one
of the blocking actions at any point in this process, depending on how
the Edge Transport server agents have been configured.
Tip
Because the majority of unwanted email
delivered today is spam, it is recommended to scan for spam messages
before performing virus scanning. This reduces the load placed on the
server when it performs virus scanning because virus scanning requires
more processing power. This best practice assumes other antivirus
mechanisms are in place throughout the network.
Installing Edge Transport Services on an Exchange Server
With a general concept of what the Edge
Transport Services does, the next step is to install Edge Services on a
system and begin configuring filters to test the results in your
environment.
|
Unlike some server functions where you can test
functionality in a lab environment, such as performance, features, and
functions, testing Edge Services filtering is a little harder to do in
an isolated environment. You need to have incoming messages, including
spam and good messages, to filter to determine the effective results of
the filters you create.
Many organizations insert an Edge Services
system into their network and set the filter settings low enough that no
good messages are accidentally filtered. Then, the organization tunes
up the filters to be more and more restrictive, effectively increasing
the filter catch rate. While the filtering is expanded, quarantine areas
are monitored to look for false positive messages ensuring that good
messages are not being filtered unnecessarily. This can take an
organization several weeks to work through the tuning; however, it
provides tight control on the processing of filtered messages.
Another option that is frequently used is where
an organization sets up a test network with a live connection to the
Internet and creates a “honeypot.” A honeypot is an Internet-connected
system that attracts messages, including spam and other content. The
process involves establishing a domain on the Internet, setting up an
email server to the domain, and then signing up to be on mailing lists
with an email account from this test domain. This might include going to
the websites of established businesses such as retail stores,
mail-order houses, and so on and signing up to receive emails about
their promotions and regular newsletters. To get less desirable content,
you could sign up to receive notification of events on sites with
questionable reputations such as triple-X sites. Do note that it could
take several weeks before your honeypot attracts enough messages to make
the filtering effective.
As a caution, make sure that if you sign up on
sites for the purpose of attracting spam that you are connected to an
Internet connection, that you clearly understand that the incoming
content might be inappropriate for professional organizations, and that
you expose the external IP address and incoming ports to questionable
content.
|
Preparing an Exchange Server 2007 System
The Exchange Edge Transport server role also needs to be
installed on a system running the Windows Server 2003 operating systems.
The minimum prerequisite required to install Exchange Server 2007 is
Windows Server 2003 with at least Service Pack 1 or Windows Server 2003
R2, Standard or Enterprise 64-bit Editions. Because this server will be
connected to the Internet, hardening the server for security is
extremely important; therefore, it is even more important that the
server system has the latest service pack and patches installed on the
system.
Installing the Exchange Server 2007 Application on the Server
After the server has Windows Server 2003
installed and is properly patched and updated, you can begin the
installation of Exchange Server 2007. To install Exchange Server using
the interactive installation process of Exchange, use the following
steps:
1. | Insert the Exchange Server 2007 CD or DVD (Standard or Enterprise).
|
2. | AutoRun
should launch a splash screen with options for installing the
prerequisites and application. (If AutoRun does not execute, select
Start, Run. Then type [CDDrive]:\setup.exe and click OK.)
|
3. | On the Start page, click Install Microsoft Exchange.
Note
Before Microsoft Exchange Server 2007 can be
installed, the Setup Installation Wizard will verify if the necessary
prerequisites have been fulfilled. If the prerequisites have not been
met, configure the prerequisites as recommended by the Configuration
Wizard.
|
4. | Setup.exe copies the setup files locally to the server on which Exchange Server 2007 is being installed.
|
5. | In the Microsoft Exchange Server Installation Wizard dialog box, on the Introduction page, click Next.
|
6. | At the License Agreement page, click I Accept the Terms in the License Agreement, and click Next.
|
7. | At
the Customer Feedback page, select whether to participate in the
Customer Experience Improvement Program by sending feedback
automatically to Microsoft, and then click Next.
|
8. | At
the Installation Type page, select the type of Exchange Server 2007
installation, and then click Next. Because this will be an Edge
Transport server, select Edge Transport for installation.
Note
If there is a need to change the
installation folder, click Browse before proceeding and specify a path
for the Exchange Server installation.
|
9. | On
the Readiness Checks page, the Installation Wizard is verifying that
the appropriate Exchange Server prerequisites have been installed. View
the status to determine if the organization and server role prerequisite
checks completed successfully, and then click Install to implement the
first Exchange Server 2007 server in the organization.
Note
If there are any errors returned or
prerequisites not met on the Readiness Checks page, it is necessary to
address these issues and retry the setup.
|
10. | To complete the Exchange Server 2007 installation, on the Completion page, click Finish.
|
Note
The Verify Deployment and Secure the Edge
Transport Server by Using the Security Configuration Wizard tasks should
be completed after you have finished configuring the Edge Transport
server filters and services.
To the right of the Finalize Deployment tab is
the End-to-End Scenario tab, outlining the recommended tasks for
end-to-end email routing scenarios along with other help topics. For
example, the Configure the Spam Confidence Level (SCL) Junk E-Mail
Folder Threshold link provides steps for setting the SCL thresholds for
delivery to the end user’s Junk E-Mail folder in Outlook.
Understanding the Edge Transport Components in the Exchange Management Console
After the Exchange Server software has been
installed on the server system that will become the Edge Transport
server, launch the Exchange Management Console to begin the process of
configuring filters and parameters. The Exchange Management Console can
be launched by doing the following:
1. | Click Start, Program Files, Exchange Server 2007.
|
2. | Choose the Exchange Management Console program.
|
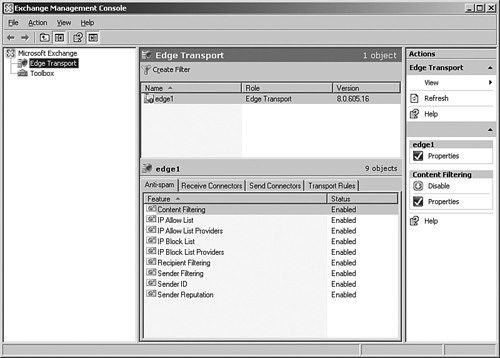
If the Edge Transport server role was selected
during the Exchange Server 2007 setup process, the Edge Transport object
and Toolbox are the only items that will be available in the console
tree of the Exchange Management Console. Selecting the Edge Transport
object in the console tree of the Exchange Management Console populates
the work pane similar to what is shown in Figure 1 with the configurable options for the Edge Transport server.
Note
All
filters, lists, and connector settings are enabled by default. As
changes are made and applied, they will be in effect on the Edge
Transport server. Careful attention to changes is necessary, especially
in a live environment. It is recommended to design and configure the
first Edge Transport server offline with the minimal configuration
needed for email routing and moderate antispam filtering. In the future,
the aggressiveness of the antispam filters can be increased and
additional filters can be added or modified. This makes troubleshooting
easier and helps ensure delivery of legitimate email, while retaining
the benefit of blocking known spam or obvious malicious email.
Several tabs are displayed within the action pane, including the following:
Anti-Spam
Receive Connectors
Send Connectors
Transport Rules
The Anti-Spam tab is selected by default and
includes all of the configurable filters, lists, and agents for
effective spam filtering. Listed alphabetically, the following nine
items are available under the Anti-Spam tab in the work pane:
Content Filtering
IP Allow List
IP Allow List Providers
IP Block List
IP Block List Providers
Recipient Filtering
Sender Filtering
Sender ID
Sender Reputation
To the right of the Anti-Spam tab is the Receive
Connectors tab. The Receive Connectors tab is used to configure email
routing for messages sent from internal users to recipients who reside
outside of the organization. From here, you can either create a new
Receive Connector or modify the default Receive Connector labeled
“Default internal receive connector <SERVERNAME>.” This connector
is enabled by default.
The tab to the right of the Receive Connectors
tab is the Send Connectors tab. The Send Connectors tab is used to
configure email routing for messages sent to internal users received
from recipients who reside outside of the organization. From here, you
can either create a new Send Connector or modify the default Send Connector labeled “Default internal send connector <SERVERNAME>.”
Note
The Send Connector does not need to be
configured if the Edge Transport server is subscribed to the Exchange
2007 organization and is receiving data from Active Directory through
EdgeSync.
The last tab in the action pane of the Exchange
Management Console for Edge Transport servers is the Transport Rules
tab. The Transport Rules tab allows for the creation of rules that
should be applied to email messages passing through the Edge Transport
server. Different conditions to check in email messages can be set for a
rule.
Take a few minutes to navigate through the
different items in the Exchange Management Console to become familiar
with the location and options for each Edge Transport server component
and service.